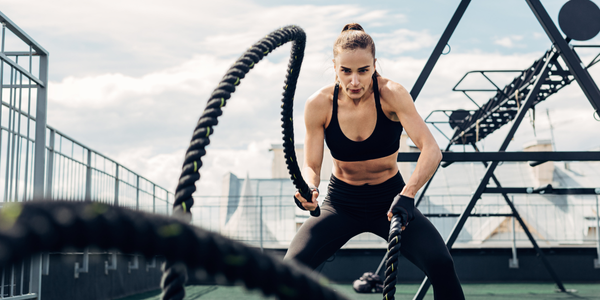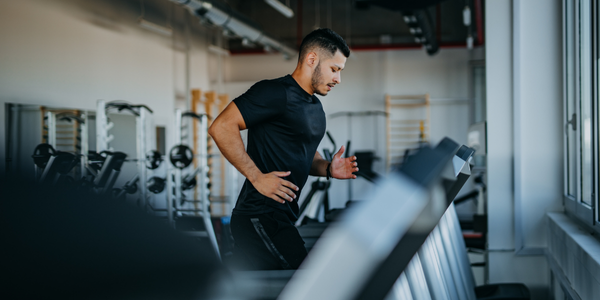
If sculpting strong, chiseled pecs is on your fitness agenda, then buckle up because we’re about to unveil the secret arsenal of cable chest exercises that will revolutionize your upper body workouts! You know, a robust and defined chest isn’t just about looks—it’s vital for enhancing overall upper body strength and performance. So if you’re ready to take your chest game to new heights, look no further than these 6 killer cable chest exercises that are bound to spice up your routines and bring about some serious gains to your chest cable workouts.
Sure, traditional weightlifting might’ve been your go-to for pumping iron into those pecs, but have you truly explored the wonders of cable exercises? Imagine precision-tailored muscle engagement and targeted activation that only cables can deliver. From obliterating the lower pectorals with decline cable flys to honing in on the upper chest with incline cable bench press—the array of possibilities these exercises offer is nothing short of phenomenal. So say goodbye to plateauing and hello to a whole new realm of diversified chest workouts waiting to test your limits! Let’s dive deep into these dynamic moves and uncover what makes them indispensable in crafting a powerful, well-defined chest. Get ready to elevate your gains and transform those pectorals like never before with a step-by-step guide for each one of these classic cable chest exercises!
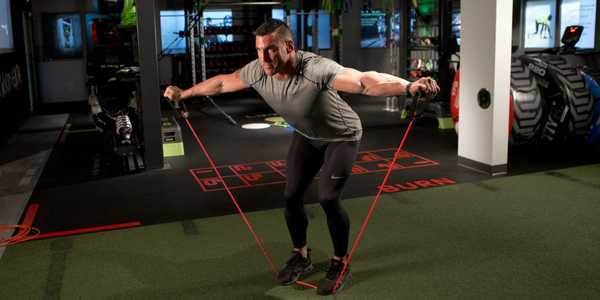
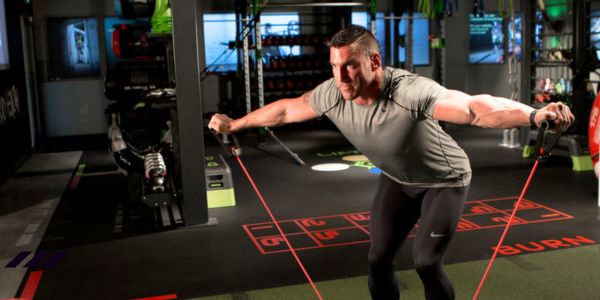
1. Upper Cable Crossover
When it comes to sculpting a well-defined chest, targeting the upper chest muscles is key for that rounded and powerful look. Upper cable crossovers are a great option in the gym for precisely this purpose. By adjusting the height of the cables and positioning yourself correctly, you can effectively isolate and engage your upper chest muscles with each rep.
Incorporating upper cable crossovers into your chest cable workout routine offers a range of benefits beyond just aesthetics. These exercises help improve overall chest strength, enhance muscle endurance, and even contribute to better posture by engaging the stabilizing muscles of the shoulders and back. Plus, working on your upper chest can add dimension to your physique and create that sought-after fullness in the pectoral region.
To make the most out of your upper cable crossover, ensure you maintain proper form throughout. Start in a tall standing position with a slight bend in your elbows, keep your core engaged, and focus on the mind-muscle connection with each crossover movement. You can also experiment with different angles and grips to target specific areas within the upper chest region. Remember to start with lighter weights to master the technique before gradually increasing resistance for optimal results.
How to do an Upper Cable Crossover with Fitness Cables and Deluxe Door Anchor:
Setup for Upper Cable Crossover
- Anchor Placement: Attach the Smart Door Anchor Deluxe at the top of the door. Make sure it’s secure and won’t slip off during the exercise. Ensure the door is closed and locked for safety.
- Cable Attachment: Loop the fitness cable through the door anchor.
- Handle Attachment: Attach the handles to the ends of the cable. Make sure they are securely fastened.
Starting Position for Upper Cable Crossover
- Stand in the Middle: Stand in the center of the two cables, facing away from the door.
- Position Feet: Place your feet shoulder-width apart. This provides a stable base for the exercise.
- Grasp Handles: Reach back and grasp the handles with an overhand grip. Your arms should be extended out to the sides, forming a “T” shape with your body.
Execution for Upper Cable Crossover
- Cross Arms: Keeping a slight bend in your elbows, exhale as you slowly bring your hands together in front of you. Cross one hand over the other, aiming to touch the handles together in front of your body.
- Squeeze Chest: At the fully contracted position, squeeze your chest muscles as hard as you can for a count of one or two.
- Controlled Movement: Inhale as you slowly return to the starting position, allowing your arms to move back out to the sides. Keep the movement slow and controlled, focusing on engaging your chest muscles throughout the entire range of motion.
Repeat Execution
- Complete Repetitions: Perform the desired number of repetitions. Start with a weight that allows you to perform 8-12 reps with good form. Allow for Rep ranges that fatigue the muscles
- Sets: Aim for 2-4 sets of the upper cable crossover exercise, depending on your fitness level and workout routine.
2. Low-to-High Cable Fly
Low to high cable flys are a dynamic chest exercise that targets the muscle fibers from various angles, promoting balanced muscle development throughout the chest. By starting these flyes in a lower position and finishing in an upward motion, you engage different parts of your chest muscles. This multi-directional approach can help enhance muscle definition and overall strength in the chest region as it recruits both the upper and lower pectoral muscles.
One of the key advantages of incorporating low to high cable flys into your cable chest workout routine is their versatility in adapting to different fitness levels. Beginners can start with lighter weights and focus on mastering proper form before gradually increasing resistance. For advanced lifters, adding challenges like pausing at peak contraction or using drop sets can intensify the workout. Correcting posture and maintaining a controlled movement throughout the exercise ensures that you’re maximizing the benefits without compromising safety.
To optimize the effectiveness of low to high cable flyes, paying attention to weight selection is crucial. Choosing a weight that allows you to complete each repetition with proper technique while feeling challenged by the last few reps is ideal. Additionally, focusing on the mind-muscle connection by squeezing your chest muscles at the top of each rep can amplify the muscle engagement and foster better results. Remember, quality over quantity – it’s essential to perform each repetition with intention and control for optimal gains in muscle definition and strength.
Setup
Same as exercise #1 EXCEPT attach to the Smart Door Anchor Deluxe at the bottom of the door.
Starting Position for Low-to-High Cable Fly
- Stand Facing Away: Stand facing away from the door, with your feet shoulder-width apart. Position yourself so that there is tension on the cable but your arms are fully extended.
- Grasp Handles: Reach back and grab the handles with an overhand grip. Your palms should be facing upward, and your arms should be slightly bent at the elbows.
- Stance: Maintain a stable stance with a slight bend in your knees and a straight back. Engage your core muscles to stabilize your body throughout the exercise.
Execution for Low-to-High Cable Fly
- Initiate the Movement: Keeping a slight bend in your elbows, exhale as you bring your hands together in front of your body in an upward and inward motion.
- Contract the Chest: At the fully contracted position, squeeze your chest muscles as hard as you can for a count of one or two. This maximizes the engagement of the lower chest muscles.
- Controlled Return: Inhale as you slowly return to the starting position, allowing your arms to move back down and outward. Keep the movement slow and controlled, focusing on engaging your chest muscles throughout the entire range of motion.
Repeat Execution for Low-to-High Cable Fly
Same as exercise #1
3.Single-Arm Cable Press
The single-arm cable press is a fantastic exercise for targeting and isolating each side of your chest independently. By using cables, you can ensure a constant tension on the muscles throughout the movement, leading to better muscle engagement and development. This exercise not only helps in building symmetrical chest muscles but also improves stabilization as each side works separately, minimizing strength imbalances.
Maintaining stability and control is key when performing the single-arm cable press. Focus on keeping your core tight and your body steady throughout the movement to effectively target the chest muscles without compensating with other body parts. Proper form is crucial in preventing injury and maximizing the benefits of this exercise.
For beginners or individuals with certain limitations, there are variations and modifications available to suit different fitness levels. Adjusting the weight resistance, starting with lighter weights, or even performing the movement seated can help in easing into this exercise. Remember, it’s more important to execute the single-arm cable press correctly with lighter weights than to risk injury by lifting too heavy too soon. As you progress with your chest cable workouts, you can gradually increase the resistance for continuous muscle growth and strength development.
Setup for Single-Arm Cable Press
Same as exercise #1 EXCEPT attach to the Smart Door Anchor Deluxe to a mid-level position on the door.
Starting Position for Single-Arm Cable Press
- Stance: Stand facing away from the door, with your feet shoulder width apart for stability.
- Grip Handle: Grasp the handle with one hand in an overhand grip. Your palm should be facing down, and your elbow should be bent at approximately 90 degrees.
- Position Hand: Position your hand at chest level, with your elbow bent and your upper arm parallel to the floor.
- Stabilize Core: Engage your core muscles to stabilize your body throughout the exercise. Keep your back straight and avoid arching or rounding your spine.
Execution for Single-Arm Cable Press
- Press Movement: Exhale as you push the handle away from your body, extending your arm fully but not locking out your elbow. Imagine you’re pushing something away from you.
- Controlled Movement: Inhale as you slowly return the handle to the starting position, allowing your arm to bend at the elbow. Keep the movement slow and controlled, focusing on engaging your chest, shoulders, and triceps throughout the entire range of motion.
Repeat Execution
Same as exercise #1
4.Cable Incline Bench Press
The cable incline bench press is a powerhouse exercise when it comes to chest day. By adjusting the incline level on the bench, you can specifically hone in on those hard-to-hit upper chest muscles, helping to create a well-rounded and sculpted chest. Unlike the traditional bench press that often places more emphasis on the lower and middle chest, the incline cable bench press shifts the focus to develop that sought-after upper chest definition.
When comparing the incline cable bench press to its traditional counterpart using free weights, one standout advantage is the constant tension provided by cables throughout the movement. This ensures that your muscles are engaged throughout both phases of the exercise, leading to greater muscle activation and growth over time. Additionally, cables allow for a smoother range of motion compared to free weights, reducing strain on the shoulder joint and providing a safer alternative for individuals with shoulder issues.
To maximize the benefits of the incline cable bench press, it is crucial to pay attention to your positioning and grip. Ensure that your back is firmly planted on the bench with your feet firmly grounded for stability. Your grip width can vary based on personal preference, but a slightly wider grip may help target the upper chest more effectively. Focus on maintaining proper form throughout each repetition to fully engage the upper chest muscles and avoid unnecessary strain on other body parts. Incorporating this exercise into your chest cable workouts can lead to noticeable improvements in upper body strength and aesthetics over time.
Setup for Cable Incline Bench Press
- Anchor Placement: If using a cable machine, adjust the pulleys to the highest setting and attach a straight bar or handles to both sides. If using a door anchor, attach it at a high level on the door.
- Cable Attachment: Connect the handles or straight bar to the cables. Ensure they’re secured tightly to prevent slipping during the exercise.
- Bench Setup: Position an adjustable bench at an incline of around 30-45 degrees. Make sure the bench is stable and secure.
Starting Position for Cable Incline Bench Press
- Seated Position: Sit on the incline bench with your back firmly against the pad. Adjust the bench so that your head, shoulders, and hips are supported comfortably.
- Grip: Grasp the handles or the straight bar with an overhand grip (palms facing away from you) slightly wider than shoulder width apart. Ensure your wrists are straight.
- Positioning: Hold the handles or bar above your chest, arms extended but not locked out. Your elbows should be slightly bent.
Execution for Cable Incline Bench Press
- Pressing Movement: Exhale as you push the handles or bar away from your body in a controlled motion. Extend your arms fully but without locking out your elbows.
- Contraction: At the top of the movement, squeeze your chest muscles for a brief moment to maximize muscle engagement.
- Lowering Phase: Inhale as you slowly lower the handles or bar back down towards your chest in a controlled manner. Keep your elbows at a slightly wide angle to emphasize the chest muscles.
Repeat Execution
Same as exercise #1
5.Standing Cable Chest Press
The standing cable chest press is a classic cable chest exercise for a well-rounded chest cable workouts. Not only does this exercise target your chest muscles, but it also engages your core for added stability. By standing upright and pressing the cables forward, you’re not only building strength in your chest but also working on balance and coordination – a true full-body workout in disguise.
To ensure you get the most out of the standing cable chest press, maintain proper posture throughout the movement. Stand tall with your feet planted firmly on the ground, engage your core, and keep your shoulders down and back. This alignment not only protects you from injuries but also maximizes the activation of your chest muscles, giving you that burn you crave during each rep.
What sets the standing cable chest press apart is its functional aspect. Mimicking real-life pushing movements, like pushing a heavy door open or shoving a heavy object across the floor, this exercise translates directly into everyday activities. By incorporating this exercise into your routine, you’re not just building muscle; you’re enhancing practical strength that can benefit you beyond the gym walls. Plus, who doesn’t love feeling strong and capable in their daily tasks?
Setup for Standing Cable Chest Press
- Anchor Placement: Attach the handles to the cable machine at chest height. If using a door anchor, attach it securely to the door at chest height.
- Handle Attachment: Attach the handles to the ends of the cables. Ensure they are securely fastened.
- Positioning: Stand in front of the cable machine or door anchor, facing away from the anchor point. Position your feet shoulder-width apart for stability.
Starting Position for Standing Cable Chest Press
- Grip Handles: Grasp the handles with an overhand grip (palms facing down) at chest level. Your elbows should be bent at approximately 90 degrees.
- Stance: Maintain a slight bend in your knees and a straight back. Engage your core muscles to stabilize your body throughout the exercise.
Execution for Standing Cable Chest Press
- Pressing Movement: Exhale as you push the handles forward until your arms are fully extended but not locked out. Focus on squeezing your chest muscles as you press.
- Contraction: At the fully extended position, squeeze your chest muscles for a brief moment to maximize muscle engagement.
- Controlled Return: Inhale as you slowly bring the handles back to the starting position, allowing your arms to bend at the elbows. Keep the movement slow and controlled.
Repeat Execution
Same as exercise #1
6.Decline Cable Flys
Decline cable flys are a game-changer when it comes to targeting those hard-to-hit lower pectoral muscles. By adjusting the bench on a decline, you shift the focus to the lower part of your chest, helping achieve that well-rounded and sculpted look. What makes decline cable flyes so effective is the constant tension provided by the cables throughout the movement, ensuring thorough activation of the muscles with each rep.
To maximize the effectiveness of decline cable flyes, pay attention to your hand positioning. Experiment with different grips – from overhand to underhand – to find what works best for you in terms of activating the lower chest muscle group. Rotating your wrist slightly during the movement can also help engage those hard-to-reach areas, providing a well-rounded chest cable workout for your chest muscles.
When performing decline cable flys, it’s crucial to maintain proper form to prevent strain or injury. Avoid locking out your elbows at the top of the movement and control both the concentric (lifting) and eccentric (lowering) phases. Common mistakes include using momentum to swing weight up instead of engaging the chest muscles properly. Focus on a slow and controlled motion to reap all the benefits of this killer exercise without risking injury.
Setup for Decline Cable Flys
- Anchor Placement: Set up the cable machine with the pulleys adjusted to the lowest setting. If using a door anchor, attach it at the bottom of the door securely.
- Cable Attachment: Attach handles or straps to the low pulleys.
- Bench Setup: Adjust a decline bench to around a 30-45 degree decline angle.
Starting Position for Decline Cable Flys
- Lie Down: Lie face-up on the decline bench with your feet securely braced at the top end of the bench.
- Grip Handles: Grasp the handles or straps with an overhand grip (palms facing each other). Keep your arms slightly bent at the elbows.
- Positioning: Extend your arms above your chest, keeping them slightly bent. Your hands should be slightly wider than shoulder-width apart.
Execution for Decline Cable Flys
- Lower the Handles: Keeping your arms slightly bent, exhale as you lower the handles out to the sides in a controlled motion. Lower them until your hands are in line with your chest or slightly lower.
- Stretch Position: At the bottom of the movement, you should feel a stretch in your chest muscles. Maintain tension in your chest without letting the weight pull your arms too far back.
- Contract the Chest: Inhale as you reverse the motion and bring the handles back together over your chest. Focus on squeezing your chest muscles together as you return to the starting position.
Repeat Execution
Same as exercise #1
Incorporate These Dynamic Cable Chest Exercises for Unbeatable Results
Congratulations on discovering these 6 killer cable chest exercises! Each move targets different areas of your chest, ensuring a well-rounded chest cable workout.
By incorporating the best cable chest exercises into your routine, you’ll not only strengthen and define your chest muscles but also improve overall upper body strength. If you don’t have cables, resistance bands will give similar results! Remember for best results to focus on proper form, adjust weight levels as needed, and listen to your body. Make these exercises a regular part of your workout regimen for the chest gains you’ve been craving! Let’s get those cables moving and watch your entire chest transform!