When it comes to training your midsection, there are a lot of things you can do. But if you’re looking for something different, we challenge you to do a Core wheel workout using the SMART Core Wheel. Not only will adding this new training stimulus keep things fun, but you can also expect to expose your core to next-level ab wheel exercises right out of the box.
Core wheels are a great combination of isometric and dynamic exercise making it the real deal when it comes to functional fitness. It’s not only a perfect tool to work your entire core but an extremely effective tool in the overall development of your midsection and upper body.
Why is the Prism Core Wheel Different than Most Ab Rollers?
First of all, don’t underestimate this fitness tool. It’s no gimmick; it really does go above and beyond typical ab training and is an excellent addition to any home gym. Your body will tell you from the first ab rollout that it’s working.
The everyday functions of your midsection include twisting, flexing, bracing, and extending. The purpose of building a stronger core is to help make these movement patterns better while reducing the chance of injury. Crunches, oblique twists, and planks are all excellent ab workout choices, but you may miss out on helping your body reach high or far if you don’t integrate extension work into your routine. Starter extension moves include inchworms, superman reaches, and long lever planks, but if you’re looking for the game-changer in core strength, the instability that comes with rolling your torso out on a wheel will take you to the next level.
The SMART Core Wheel works by forcing your body to function in synchronized control. You need to use your whole chain of muscles from your hip flexors to your shoulders to work together to stay in form.
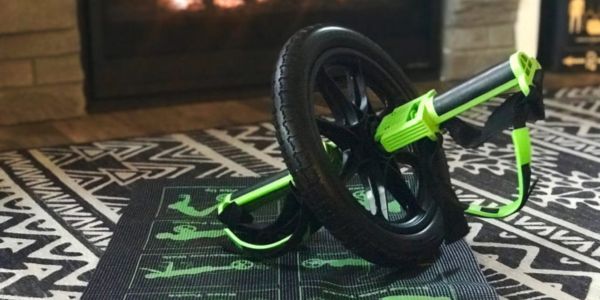
The Smart Core Ab Wheel comes with it’s very own floor mat, which is invaluable not only to your hands and knees but also your workout routine – the mat features 6 wheel exercises printed directly on it for easy reference. The Smart Core Ab Wheel also delivers the best core workout for the entire core (not just abs!) with one tool. Strap your feet or grip the handles for a great core-focused workout.
Want to add more than a core wheel to your home gym? Check Out the Smart Core Strength Training Bundle
How does a core wheel work?
The true power of the core wheel lies in its simplicity. The basic premise is that you start on your knees or standing, grab the handles with your hands, and set the wheel on the ground. Next, you roll forward until your body is fully extended, then roll back to the starting position. Additionally, because our core wheel also comes with foot straps, there are a whole host of core wheel workouts. You can do that you can do with your hands on the floor, feet strapped to the pedals, and use the wheel to roll your feet back and forth.
The core wheel rollout exercises engage your entire mid-section, and when working altogether, these muscles act like a corset pulling everything in. The core wheel actively recruits your stabilizer muscles to keep you from falling over – internal obliques, external obliques, and transverse abdominis. Rolling the wheel fires up your rectus abdominis, otherwise known as, your abdominal muscles. Your upper body even gets in on the action by engaging the erector spinae (muscles along your spine) and latissimus dorsi (broad muscles on both sides of your back), as well as your deltoids (shoulder muscles), chest, biceps, and triceps.
But the real key here is all about synchronized control. The whole chain of muscles from your hip flexors and up toward your shoulders must work together to stay in form with no breaks in the chain.
Form Matters!

Remember, it takes a lot of control and strength, from both your core and your entire body, to use this tool correctly. Proper form will help you from straining your lower back or putting too much stress on your joints. It’s always better to do one good move in proper form than ten moves in poor form.
Be sure to keep your spine neutral, chin tucked, and brace your abs. Your goal should be to avoid arching your lower back as you roll out. If you feel this happening, reduce your range of motion (shorten the roll). Avoid putting too much stress on your shoulders, wrists, elbows, and back.
Starting a Smart Core Wheel Workout
Even if you are pretty fit, you’ll find that the core wheel is a great piece of equipment to challenge your body. To prevent injury, you’ll want to practice building core strength with your body weight.

1. First, build a base of core strength.
If you’re new to these exercises, start with a limited range of motion and gradually increase it as your core strength improves. Start by building these non-core wheel moves into your workout routine to be more successful with your core wheel progression.
Plank Holds
How to Do a Plank Hold
Setup
- Find a Comfortable Surface:
- Use a yoga mat or a soft surface to protect your elbows and knees from discomfort. If you’re doing a full plank, ensure the floor is clean and comfortable.
- Starting Position:
- Begin by getting into a push-up position, but instead of lowering yourself to the ground, keep your body straight and hold it.
Get Moving
- Position Your Hands:
- Place your hands directly under your shoulders, slightly wider than shoulder-width apart. Your fingers should be spread out to help with balance.
- Engage Your Core:
- Tighten your abdominal muscles and pull your belly button towards your spine. This engagement helps protect your lower back and maintain a stable position.
- Extend Your Legs:
- Extend your legs behind you, with your toes touching the floor. Your body should form a straight line from your head to your heels. Avoid letting your hips sag or pike upwards.
- Hold the Position:
- Keep your body in a straight line, with your head aligned with your spine. Avoid looking up or down; instead, keep your gaze focused on a spot on the floor in front of you.
- Breathe Steadily:
- Breathe deeply and steadily throughout the hold. Avoid holding your breath, as steady breathing helps maintain stability and endurance.
- Maintain Proper Form:
- Ensure your shoulders are away from your ears, and your elbows are directly beneath your shoulders if doing a forearm plank.
Inchworms
How to Do Inchworms
Setup
- Find a Suitable Surface:
- Use a yoga mat or a clean, soft surface to make the exercise more comfortable.
- Starting Position:
- Stand with your feet hip-width apart and your arms by your sides.
Get Moving
- Bend at the Waist:
- Hinge at your hips and bend forward, reaching towards the floor with your hands. Try to keep your legs as straight as possible while doing this. If you can’t touch the floor, bend your knees slightly.
- Walk Your Hands Forward:
- Place your hands on the floor and walk them forward, moving one hand at a time, until your body is in a plank position (a straight line from your head to your heels). Your hands should be under your shoulders, and your core should be engaged.
- Hold the Plank:
- Briefly hold the plank position, ensuring your body is aligned and your core is tight. This helps engage your core muscles and strengthen your upper body.
- Walk Your Hands Back:
- Walk your hands back towards your feet, moving one hand at a time, while keeping your legs as straight as possible. Your goal is to return to the starting position.
- Stand Up:
- Once you’re back in the starting position, stand up fully and reset your posture.
- Repeat:
- Perform the movement for 8-12 repetitions, or as many as you can maintain with good form.
Bird Dogs
How to Do Bird Dogs
Setup
- Find a Comfortable Surface:
- Use a yoga mat or a soft surface to protect your knees and hands.
- Starting Position:
- Begin on all fours, with your hands directly under your shoulders and your knees directly under your hips. Your back should be flat, and your head should be in a neutral position, looking straight ahead.
Get Moving
- Engage Your Core:
- Tighten your abdominal muscles to stabilize your spine. Avoid letting your lower back sag or your hips shift.
- Extend One Arm and the Opposite Leg:
- Slowly extend your right arm forward while simultaneously extending your left leg straight back. Keep both your arm and leg in line with your body, not allowing them to droop or rise excessively.
- Hold the Position:
- Hold this extended position for 2-3 seconds, maintaining balance and keeping your core engaged. Ensure that your body remains stable and your back stays flat.
- Return to Start:
- Slowly lower your arm and leg back to the starting position, keeping control of the movement.
- Switch Sides:
- Repeat the movement on the opposite side by extending your left arm forward and your right leg back.
- Complete the Set:
- Perform 8-12 repetitions on each side, or as many as you can maintain with proper form.
Low plank mountain climbers
How to Do Low-Plank Mountain Climbers
Setup
- Find a Comfortable Surface:
- Use a yoga mat or a soft surface to protect your elbows and knees.
- Starting Position:
- Begin in a low plank position (also known as a forearm plank). To do this, place your forearms on the floor with elbows directly under your shoulders. Your body should form a straight line from your head to your heels.
Get Moving
- Engage Your Core:
- Tighten your abdominal muscles to stabilize your spine and avoid letting your hips sag or rise. Keep your body in a straight line.
- Start the Movement:
- Lift your right foot off the floor and bring your right knee towards your chest. Keep your hips low and maintain a steady core engagement.
- Return and Alternate:
- Return your right foot to the starting position and quickly switch to the left side. Bring your left knee towards your chest while keeping your core engaged and hips stable.
- Continue Alternating:
- Alternate between bringing your right knee and left knee towards your chest in a running-like motion. Aim to keep a steady and controlled pace.
- Maintain Form:
- Throughout the exercise, keep your shoulders away from your ears, your back flat, and your core tight. Avoid letting your hips shift or drop.
- Complete the Set:
- Perform the exercise for 30-60 seconds or for a set number of repetitions, such as 20-30 per leg, depending on your fitness level.
2. Add a Few Ab Wheel Workouts
Next, add a core wheel segment to your ab training regimen. The key to success is to work this tool into your core workouts in a progressive format. Start with the beginner moves, and don’t be discouraged if you can only do a handful.
Try this Beginner Core Wheel Workout
Here are some exercises to try right out of the box. Perfecting these moves first will boost your form (and confidence!) to get the basics down before you move on to more challenging moves.
Even if you want to jump right into the intermediate and advanced moves on the core wheel, you’ll have better success if you master the form in the beginner moves. It will improve your control when the weight shifts in the wheel. There are a variety of ways to use the core wheel. Try these different exercises to increase your overall strength.
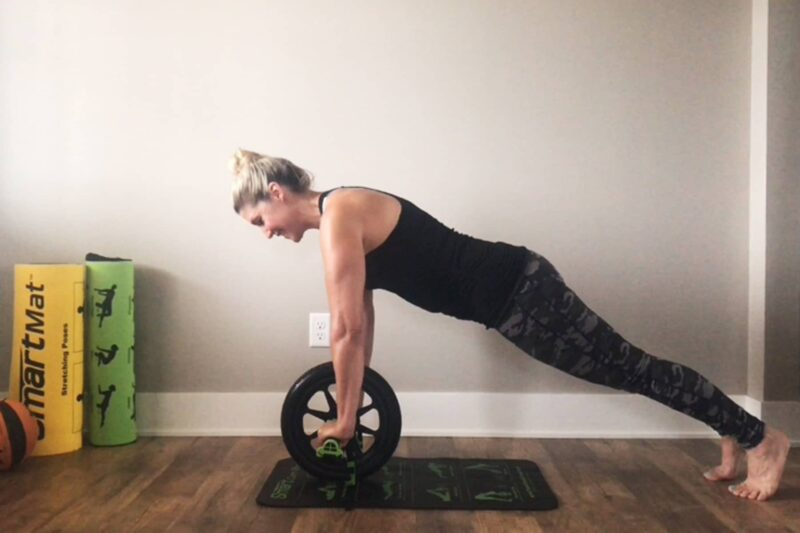
AB WHEEL PLANK:
Place your hands on the pedals and position them directly below your shoulders.
Your feet should be hip-width apart.
Lift to a plank hold
KNEE ROLL-IN:
Start in a plank hold (see move 1).
Drop your knees to the floor and roll the core wheel back toward your body.
Roll out again until your hands are under your shoulders and lift back to plank hold.
Repeat.

KNEE ROLL-OUT:
Start in kneeling position.
Roll the wheel away from your body as far as you can go while keeping your abs braced, your back free from strain.
As you get more experienced with the core wheel, you will be able to reach your arms all the way out, and your body hover directly above the floor.

SIDE ROLL-OUT:
Start in kneeling position.
Roll the wheel away from your body as far as you can go, while keeping your abs braced and your back free from strain.
As you get more experienced with core wheel exercises, you will be able to reach your arms all the way out and your body hover directly above the floor.

Want to see these moves in action?
Click here: 4 Basic Moves for the Core Wheel – YouTube
CLICK HERE FOR A PRINTABLE VERSION!
3. Next, Add a few Advanced Exercises with the SMART Core Wheel
Before you know it, your muscles will become stronger and learn to work together, and you’ll be adding to your rep count in no time. When you’re ready, move to the intermediate and advanced moves. Even if you want to jump right into the intermediate and advanced ab wheel exercises, you’ll have better success if you master the form in the beginner moves. It will improve your control when the weight shifts in the wheel.
Here is your next three core wheel challenge moves. Maybe try to challenge a friend!
- SMART Core Wheel Knee Rollouts with Opposite Knee Plank Mountain Climbers
- Plank Hold on SMART Core Wheel with Feisty Floor Sprints
- Round the World Pike Ups with the SMART Core Wheel
Want to see these moves in action?
Click here: Core Wheel Workout Challenge – YouTube
BONUS Core Wheel Exercise:
Plank Hold Tap Outs: Place your hands on the pedals and position them directly below your shoulders. Feet should be hip width apart. Lift to a plank hold. Keeping your hips from dipping down, tap one foot out past hip-width and return, and repeat with the other foot. As you’re building strength, return to the knees for a break.
Core wheels provide a unique and effective way to train your core. With the combination of isometric exercises and dynamic movements, core wheels can assist in achieving optimal fitness goals. Strength and stability are two key components that the core wheel is designed to focus on, and the results are undeniable.
The low impact nature of the device makes it a suitable choice for those just starting out or who are recovering from an injury. Ab wheel exercises are a great addition to any workout routine, providing a great way to strengthen your core muscles and improve your overall health.